


Figuring out exactly where to plug in case fans on your motherboard is one of those tasks that feels daunting until you realize the board is actually labeled quite clearly. Most builders get stuck staring at a sea of identical-looking pins, wondering if they’re about to fry their components or just leave their system running hot.
You don’t need to be an electrical engineer to get your airflow sorted; you just need to know how to identify the right headers. Once you locate these small, multi-pin clusters, you’ll be able to manage your cooling effectively, keeping your hardware stable during those long gaming sessions or heavy creative workloads.
Identifying Your Motherboard Fan Headers
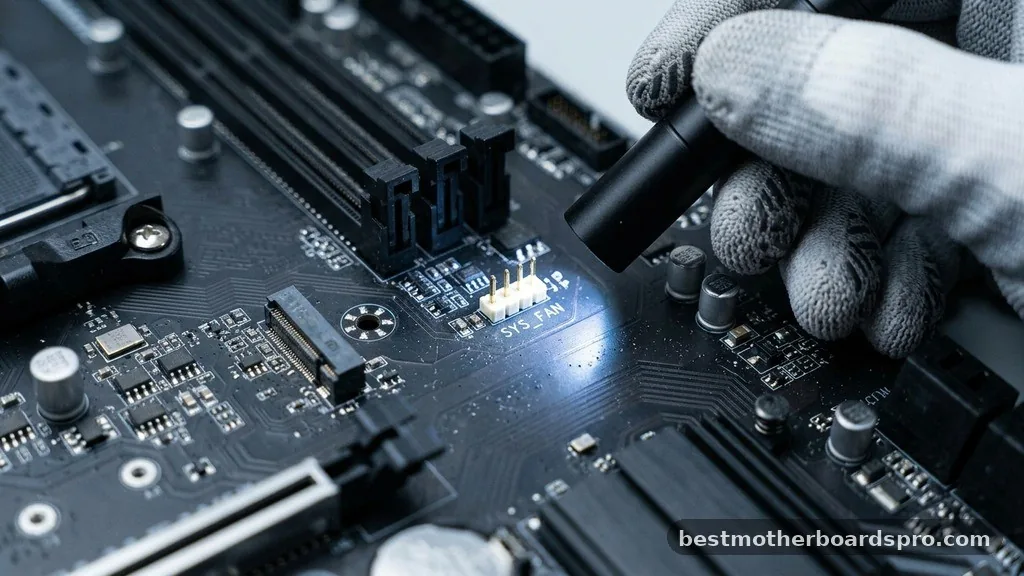
The first step in your cooling journey is locating the correct ports. Motherboard manufacturers almost always print labels directly onto the PCB, usually right next to the pins.
You are looking for text that reads “SYS_FAN,” “CHA_FAN,” or “CASE_FAN.” These are the dedicated ports for your chassis cooling.
Avoid confusing these with the “CPU_FAN” header, which is strictly reserved for your processor cooler. The CPU header is designed to monitor the temperature of your processor specifically and adjust fan speeds in real-time. If you plug a standard case fan into the CPU header, your BIOS might throw an error because it doesn’t detect a processor cooler, or it might ramp up your case fans unnecessarily when the CPU gets warm.
Understanding Fan Connector Types
When you look at your cables and the motherboard pins, you will likely encounter two main standards. Most modern fans use either a 3-pin or a 4-pin connector. Knowing the difference is crucial for how you control your hardware.
A 3-pin connector uses voltage regulation to control speed. The motherboard sends more or less power to the fan to make it spin faster or slower.
A 4-pin connector utilizes Pulse Width Modulation, commonly known as PWM. This method is generally superior because it allows for more precise speed control without the need to fluctuate the actual voltage.
| Connector Type | Control Method | Pin Functionality |
|---|---|---|
| 3-Pin | Voltage Regulation | Ground, Power, Tachometer |
| 4-Pin | PWM (Pulse Width Modulation) | Ground, Power, Tachometer, PWM Signal |
You can safely plug a 3-pin fan into a 4-pin motherboard header. The plastic tab on the connector ensures it aligns correctly, leaving the fourth pin empty. You lose the PWM functionality, but the fan will still function perfectly.
Managing Fan Power and Distribution
If your case has more fans than your motherboard has headers, you have a few options. You don’t necessarily need to buy a brand new motherboard or stop adding fans. Many builders use fan splitters or dedicated fan hubs to expand their connectivity.
A simple splitter cable allows you to run two or three fans from a single header. This works well for identical fans, but you should be cautious about how much power you pull from one port.
Motherboard headers are typically rated for 1 Amp (12W). If you exceed this, you risk damaging the motherboard’s circuitry.
- Check the total amperage of all fans connected to a single header.
- Use a powered fan hub if you are connecting more than three fans to one location.
- Ensure your splitter cable supports PWM signal pass-through if you want to control all fans simultaneously.
- Always verify the label on the motherboard to ensure you are using a fan header rather than an RGB header.
Distinguishing RGB and ARGB Headers
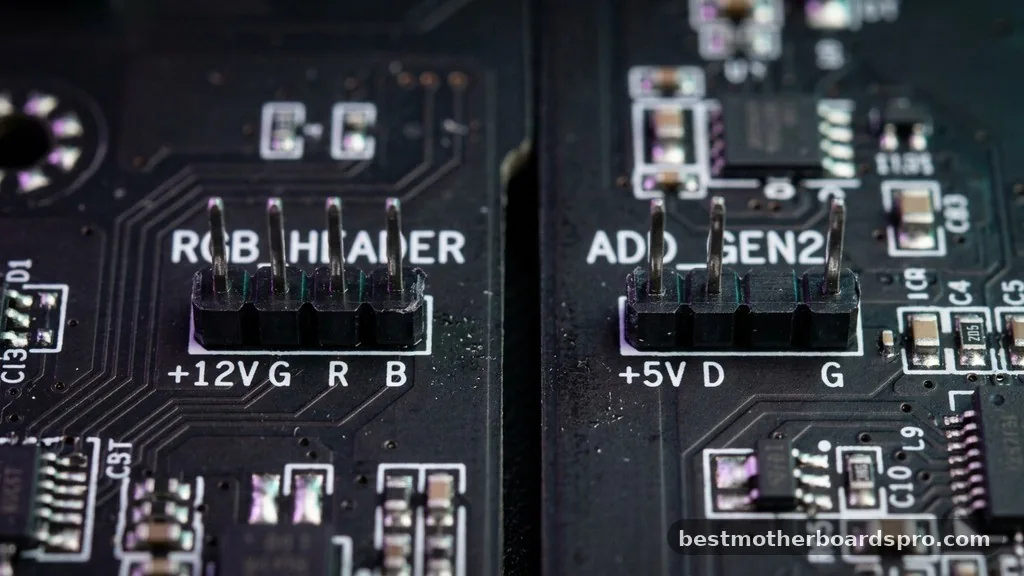
A common mistake is plugging a fan’s lighting cable into a fan power header, or vice versa. These headers look similar but serve entirely different purposes. Fan power headers are for the motor; RGB headers are for the LEDs.
Standard RGB headers use 12V power and have 4 pins. Addressable RGB (ARGB) headers use 5V and typically have 3 pins with a gap.
Plugging a 5V ARGB cable into a 12V RGB header will instantly burn out the LEDs on your fan. Always double-check your motherboard manual before connecting anything related to lighting.
Configuring Fan Curves in BIOS
Once everything is plugged in, your work isn’t quite finished. You should enter your BIOS to ensure the fans are running at an appropriate speed. Most modern boards have a hardware monitor section where you can adjust fan curves.
Configuring fan curves in BIOS allows you to balance noise levels and cooling performance. You can set the fans to spin slowly while the PC is idle, making it nearly silent, and have them ramp up as the system temperature increases. This prevents your PC from sounding like a jet engine when you’re just browsing the web, while still providing the airflow needed during intense tasks.
Addressing Common Connectivity Gaps
Some users struggle when they encounter headers labeled “OPT” or “W_PUMP.” These are not standard chassis fan headers. The “OPT” header is usually a secondary CPU fan port, often used for dual-fan air coolers or AIO liquid cooling setups.
The “W_PUMP” header is specifically designed for water pumps. It often runs at full speed by default to ensure the pump always has enough power to circulate coolant.
If you plug a standard case fan into this, it might run at 100% speed constantly, which will be quite noisy. If you run out of standard CHA_FAN ports, you can often reconfigure these headers in the BIOS to act as standard fan controllers, but you must manually change the settings to avoid constant high-speed operation.
Frequently Asked Questions
Do case fans plug into the motherboard or the PSU?
Most modern case fans are designed to plug directly into the motherboard headers labeled SYS_FAN or CHA_FAN. This allows the system to monitor and control their speed. While some older or high-performance fans can plug into the power supply using an adapter, you lose all speed control functionality.
Is 10 fans in a PC overkill?
For the vast majority of users, 10 fans is significant overkill. Most systems perform optimally with three to five fans. Adding too many fans can actually create turbulence and restrict airflow, and it often just increases noise levels without providing any meaningful reduction in component temperatures.
Are case fans 3-pin or 4-pin?
Case fans come in both 3-pin and 4-pin configurations. 4-pin fans support PWM control, which allows for finer speed adjustments, while 3-pin fans rely on voltage changes. Both are compatible with most modern 4-pin motherboard headers, though you only get full PWM control if both the fan and header are 4-pin.
Can I use a fan hub to power all my fans?
Yes, using a powered fan hub is a great way to manage multiple fans. It draws power directly from your power supply via a SATA or Molex connector, taking the load off your motherboard headers. This is the safest method when you have a high number of fans installed.
Final Thoughts on Fan Management
Setting up your cooling system correctly is a satisfying part of the PC building process. By identifying the right headers, understanding the difference between power and lighting connections, and fine-tuning your settings in the BIOS, you ensure your system runs efficiently and quietly. Don’t be afraid to experiment with your fan curves to find that perfect balance between silence and performance.
If you ever feel unsure, your motherboard manual is your best friend—it contains a detailed map of every header on the board. Take your time during the installation, keep your cables tidy, and enjoy the peace of mind that comes with knowing your hardware is well-ventilated. When you know exactly where to plug in case fans on your motherboard, you’ve mastered one of the most essential aspects of custom PC maintenance.



