
Figuring out exactly where to plug in fans on motherboard layouts can feel intimidating if you are building your first PC. Most modern motherboards include several dedicated headers specifically designed for cooling, but distinguishing between them is vital for system stability. You need to ensure your processor stays cool while keeping your case airflow balanced.
By identifying the correct pins and understanding how your motherboard manages power, you can avoid common issues like high temperatures or annoying fan noise. This guide provides the clarity you need to connect your cooling hardware properly, ensuring your system runs efficiently and remains quiet under load.
Identifying Different Fan Headers
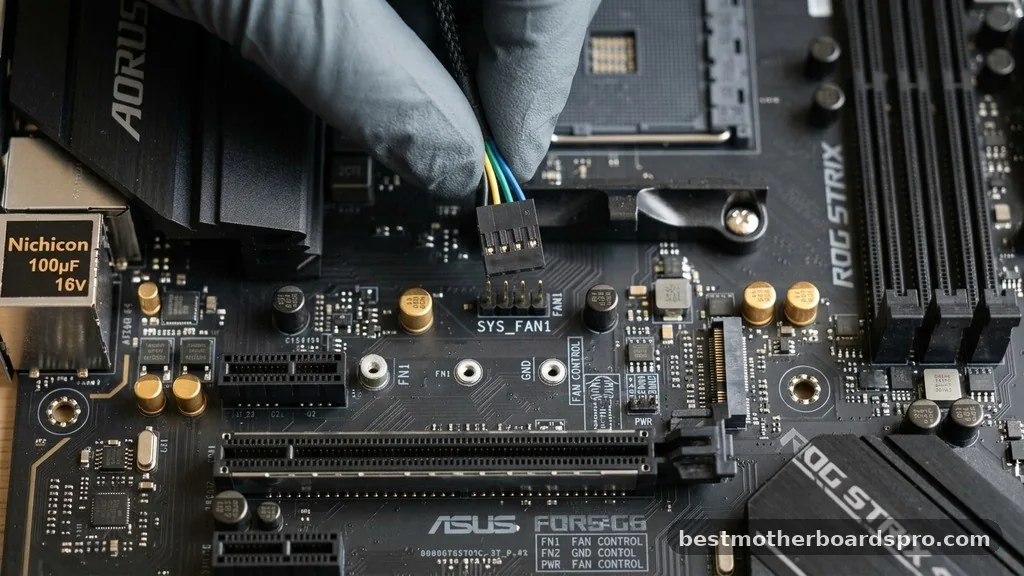
The first step in cooling your system is locating the correct ports on your motherboard. Manufacturers label these headers clearly, though the naming conventions can vary slightly between brands like ASUS, MSI, or Gigabyte.
The most important header is the CPU_FAN, which is reserved specifically for your processor’s cooling solution. Your motherboard monitors this header constantly; if no fan is detected here, the system might trigger a BIOS POST error, preventing the computer from booting.
Other headers, often labeled as SYS_FAN or CHA_FAN, are designed for your case fans. These are usually 4-pin fan headers that support both PWM and DC voltage control. While a 3-pin fan will physically fit into a 4-pin header, you lose the ability to use pulse-width modulation for precise speed control.
Instead, the motherboard relies on DC voltage mode to adjust the speed by fluctuating the power sent to the motor. Always check your motherboard manual to confirm which headers are PWM-capable, as some budget boards may only offer full control on select ports.
Understanding 3-Pin vs 4-Pin Connectors
Understanding the physical difference between fan connectors is essential for successful installation. A PWM 4-pin connector includes an extra wire dedicated to speed control, allowing the motherboard to send precise signals to the fan motor. This results in much smoother operation and better airflow optimization compared to older 3-pin designs.
| Connector Type | Pin Count | Control Method | Best Use Case |
|---|---|---|---|
| PWM | 4-Pin | Pulse-Width Modulation | CPU Cooling & High-Performance Fans |
| DC/Voltage | 3-Pin | Voltage Regulation | Basic Case Ventilation |
| Molex/SATA | 2-Pin/Direct | Constant Power | Non-Adjustable Fans |
If you are using a 3-pin fan on a 4-pin header, the plastic guide on the connector ensures you align it correctly. It will only fit one way, so do not force it. The extra pin on the header will simply remain unused, and your motherboard will manage the fan speed by adjusting the voltage rather than using a PWM signal.
Options for Managing Multiple Fans
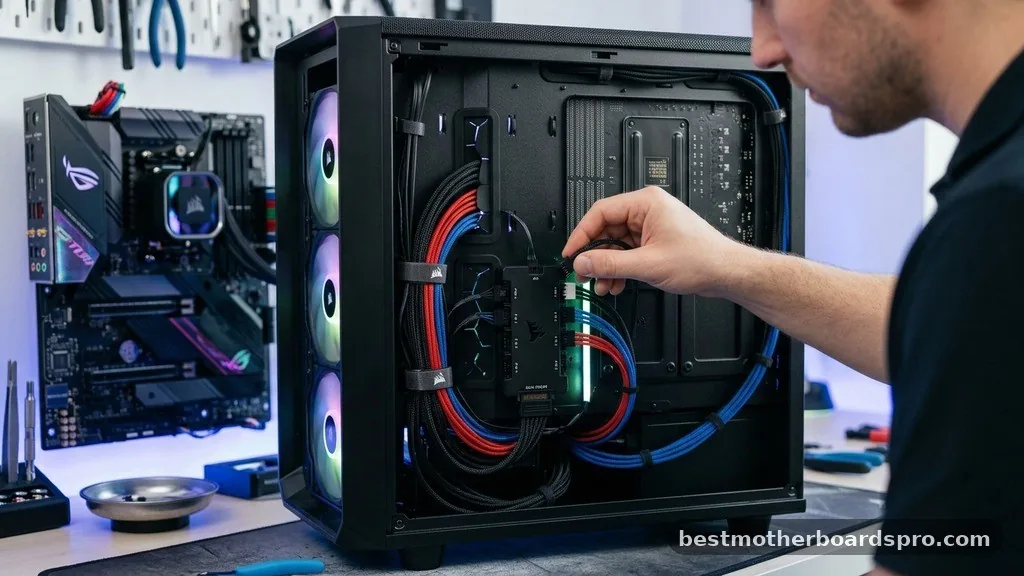
If your motherboard lacks enough headers for all your intake and exhaust fans, you have a few reliable alternatives. Many builders use a fan splitter to connect two or even three fans to a single motherboard header. However, you must be careful not to exceed the amperage limit of that specific header, as drawing too much power can damage the motherboard circuitry.
- Fan Splitter: Best for two fans of the same model; shares the PWM signal across both devices.
- Powered Fan Hub: Ideal for large builds; draws power directly from a SATA power connector rather than the motherboard.
- Molex Adapter: A legacy method that runs fans at 100% speed constantly; not recommended for noise-sensitive builds.
- Daisy-chaining: Some modern fans allow you to plug one fan directly into the frame of another, simplifying cable management.
When using a powered fan hub, the motherboard only receives RPM monitoring data from the single fan plugged into the “master” port. This is usually sufficient for monitoring, but it means you cannot control the speed of each fan individually if they are all connected to the same hub.
Optimizing Fan Curves and Airflow
Once everything is plugged in, the real work of cooling happens in the software. Accessing your BIOS fan control settings—often referred to as Q-Fan Control in ASUS boards—allows you to define custom fan curve settings. These curves dictate how fast your fans spin based on the temperature of your CPU or motherboard.
For effective intake vs exhaust balance, try to maintain slightly higher intake pressure to keep dust buildup down. If you have three fans pulling air in from the front and one pushing it out the back, your system will naturally stay cleaner. Test your settings under load to ensure that your fans ramp up smoothly when the system gets hot, rather than oscillating between loud and quiet states.
Solving Common Installation Challenges
Sometimes, things do not go as planned during assembly. If your PC fails to boot and displays a fan error, double-check that your CPU cooler is plugged into the dedicated CPU_FAN header. If you are using an AIO liquid cooler, the pump should often go into a dedicated “PUMP” header if your board has one, though the CPU header remains the safest bet for the radiator fans.
Another common issue is fan noise. If a fan is running at maximum speed constantly, it is likely because the BIOS is set to “Full Speed” mode instead of “Standard” or “Silent.”
Double-check the settings in your motherboard utility to ensure the header is set to the correct mode (PWM or DC). If you have accidentally plugged a fan into the front panel headers, you will notice the system won’t start correctly, as those pins are reserved for your power button and LEDs.
Frequently Asked Questions
Can I plug a 3-pin fan into a 4-pin motherboard header?
Yes, you can safely plug a 3-pin fan into a 4-pin header. The connector is keyed to fit into the first three pins, leaving the fourth pin exposed. Your motherboard will automatically switch to voltage-based control to regulate the speed, though you lose the precision of PWM signals.
What happens if I don’t plug anything into the CPU_FAN header?
Most modern motherboards perform a safety check during boot. If the BIOS detects zero RPM on the CPU_FAN header, it will often trigger a warning or refuse to start the system to prevent the processor from overheating. You should always connect your primary CPU cooler to this specific header.
Are powered fan hubs better than splitters?
Powered hubs are generally safer because they draw power from your power supply unit via a SATA or Molex connector, rather than taxing the motherboard’s headers. This is the preferred method if you are running more than three fans, as it prevents potential electrical damage to the motherboard.
How do I know if my fans are set up for intake or exhaust?
Most fans have small arrows on the side of the frame indicating the direction of airflow and blade rotation. Generally, the side with the plastic support struts is the “exhaust” side, while the open side is the “intake.” Aim for a balanced setup with more intake than exhaust.
Final Thoughts on Cooling Configuration
Mastering where to plug in fans on motherboard headers is a fundamental skill for any PC builder. By keeping your CPU cooler on the primary header and utilizing powered hubs for additional case ventilation, you ensure that your components remain within safe thermal limits. Remember that your BIOS fan control is your best friend when it comes to balancing performance and noise.
Always take a moment to verify your connections before closing the side panel, and don’t hesitate to adjust your fan curve settings if you find your system runs warmer or louder than expected. With these basics covered, your machine will run reliably for years to come. If you have questions about a specific motherboard model, the manufacturer’s manual remains the ultimate source of truth for your layout.